Microsoft Word has no competition as far as writing, editing and managing documents as well as reading them is concerned. It gets even better when you know how to input data into the functions appropriately.
Well, one of the frequently used operations in the Word is to select one or several pieces of text for emphasis or to mark important points by underlining, using circles or other shapes. It will help you highlight an important paragraph, a particular word or phrase, and an object or an image depending on the following capabilities of Word.
In this blog post, we will explain to you, with the help of various examples, the possibility of circling an object in Word using texts and images. In this way, you can achieve interest, build up a structure, and enhance your document in terms of visual appearance and stress significant messages.
2 Methods to Circle Something in Microsoft Word
However, there are various ways to circle a piece of text or a part of an image in Word that we will focus on effecting ways among them all. For that, we will make two procedures using two tools; the “Shapes” tool and the “Drawing” tool. Okay, so here we have the first one ready for analysis!
1. Using the Shape Tool to Circle Something in Microsoft Word
Word’s Shapes tool is indeed one of the most powerful tools in this application, and that is why it is the first method we have chosen for the purpose. So, to circle something in Word, follow the steps below:
- Open the document in Word.
- Select Insert on Word’s menu bar, then click the ‘Shape’ option.
- Now, click on the ‘Oval’ shape, as Word does not have a particular circle shape.
- This will help you to circle as given below; just draw the shape over the piece of content you want to circle.
- Since the shape is oval, you need to hold down the ‘Shift’ key first before using it as a circle.
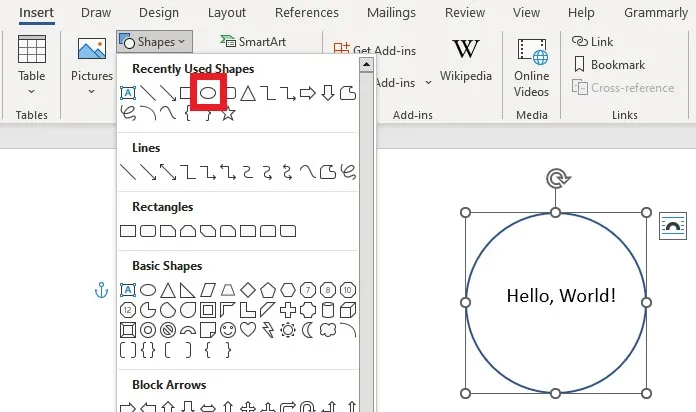
- After you have drawn over like in the diagram below, click ‘Shape Fill’.
- Next, click the ‘No Fill’ option to make the content inside of the circle you had drawn visible.
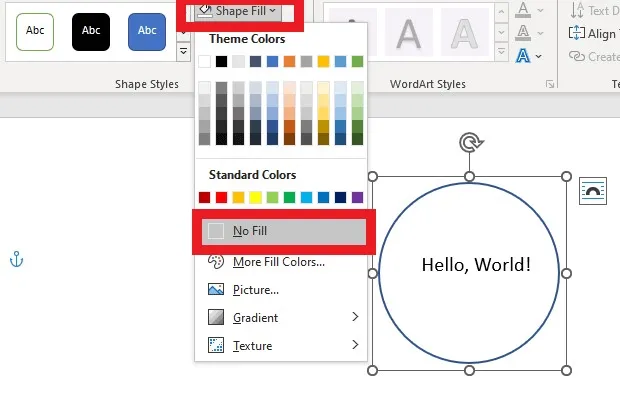
- There is an advantage for you in that you can alter the circle’s shaded outline with the ‘Shape Outline’ option.
This is how easy it is done circle something in Word using the Shapes tool. We would now move over to the next method Let us now move over to the next methodology.
2. Using the Drawing Tools to Circle Something in Microsoft Word
There are a few general-purpose drawing tools in Microsoft Word. For this second method, let me use the Scribble tool in Word that enables me to create the circle needed for the text or image and the ‘Draw’ tab, making it a 2 in one-chance. Here is how to do it:
- Find the ‘Freeform: Scribble in the line under the tools’ category of shapes.
- Incidentally, utilize it to create a circle across the content you’d want (do this as keenly as could be expected).
- As before, use ‘No Fill’ to get only the outline of the circle in this case as well.
As for the dedicated ‘Draw’ tab in Word and circling something with it in Word, follow the steps below:
- First, close the previous document and then read the ‘Draw’ tab.
- Now choose the ‘Pen’ tool because we are going to create a circle.
- Find the text or the image you wish to encircle then draw with your mouse over it.
- Clicking this little downward arrow, you may alter the color, thickness, etc., of the ‘Pen’ tool.
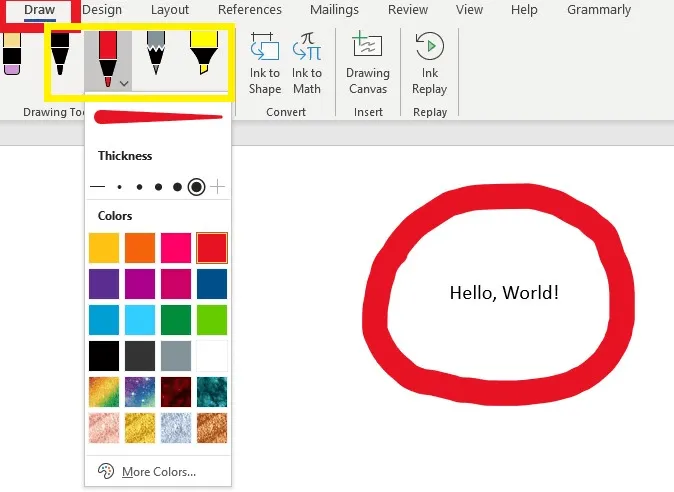
I also found it fairly easy to use Word’s drawing tools to circle the content that was required. However, the drawing tools can be a little absurd when making a circle, as these particular tools, especially Scribble, are freehand drawing tools, and the quality of the circle drawn depends on the precision of the person drawing these shapes.
2 Methods to Circle Something in WPS Word
You may be using WPS Word, a perfect equivalent of Microsoft Word, in coming to this guide. Do not worry; we have an equally good two methods to circle something in WPS word for you. Let’s take you to those now!
1. Circle Something in WPS Word with the Shapes Tool
To circle something in WPS Word using its Shapes tool, follow the steps below:
- Click the mentioned document in WPS Word and search for the object you want to circle.
- Now, click the word “Insert” located at the top of the screen.
- Select the arrow in the illustration group and choose shapes.
- Choose the circle shape in the list button of shapes.
- Move the mouse to the object you want to circle and then simply hold the left button of the mouse and pull the circle.
- It is now possible to change the size, position of the circle, and color according to the requirements.
2. Using the Highlighting tool to Circle Something in WPS Word
Now that we are making a circle in WPS Word with the Shapes tool, let’s take this to the next level with the Highlighting tool, and for that, here are some easy steps:
- WPS Word will open the document and place the cursor at the point where the operation was started; click the word ‘Home’ in the toolbar at the top of the page and move down to the tab labeled ‘ Morales Poses ’; the selected text or object will have a circle of its own.
- Select the button labeled “Home” at the top of the window.
- Press the drop list button marked “Text Highlight Color” in the “Font” tab.
- See that you select a color that is not near to the color of the text or the object you are highlighting.
- Place the cursor on the text that requires the borders, highlight it, and right-click from the drop-down that appears to select borders and shading.
- Select the “Borders and Shading” option at the backside of the ‘Borders’ dialog box.
- On the “Settings” tab, click on the “Circle” selection.
- Select the circle color and its line style.
- Press the “OK” button to place the circle around the highlighted text or some object.
This is the end of the two methods. Throughout, we can circle text or image content in WPS Word.


![How to insert a Word document into Excel [Top 8 Methods]](https://samplates.com/wp-content/uploads/2024/12/How-to-insert-a-Word-document-into-Excel-768x432.jpg)
