Place today is much more important to protect your work from the outside people who may use it for their own benefit. One of the most useful tips in it is to work with watermarks; this is how you can do it. A watermark is an unobtrusive graphical image that can be superimposed on media, including images or other sorts of docs. It displays the copyright or different information about the originality of these media. Adding a watermark in Microsoft Word is very simple, and in this guide, we will mention only a few steps.
Learning how to create a watermark in Word may be important if you are a graphic designer, writer, or the owner of a company. In this article, you will learn how to create a watermark in Word, starting from choosing the right image or text and the presence and absence of customization.
By following these few measures, you can make your documents more polished and your ideas protected. Apart from the common ways of adding watermarks, which are easily available in Microsoft Word, a big trick is awaiting you in the article!
Two Methods How to Make a Watermark in Word
Generally, you’ll find several kinds of watermarks in Word. These include picture watermarks, text watermarks, and company watermarks. Here are these options, depending on your choice and the needs that you have in the preparation of your document.
Therefore, in the following part of this article, we will introduce two ways for adding or inserting a watermark in Word: the direct way and the personalized way. Therefore, I will present you with a comprehensive guide, so read below.
1. Place a watermark right into the Word
Yes, all the watermarks that you can use in Word can be inserted directly into the Word using Word’s options. Follow these steps:
- To watermark a Word document, first, from your PC, pull up the document that needs the watermark.
- Click the “Design” tab.
- Select the “Watermark” choice in the “Page Background.”
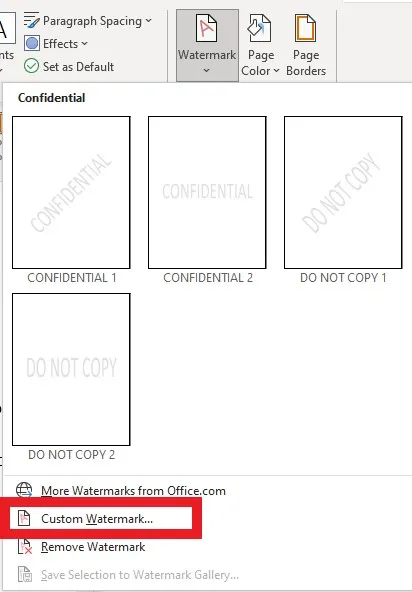
- Select a built-in watermark from the list; these include, but are not limited to, ‘CONFIDENTIAL’ ‘DRAFT’ or ‘URGENT.’
- This watermark will be placed in your document.

2. Make and add a custom watermark to Word
To add a custom watermark to a document in Word, you can follow these steps:
- Select the document that has to be watermarked by opening it in the program.
- Click the “Design” tab.
- In the “Page Background” tab, select “Watermark.”
- Choose the ‘Custom Watermark’ option, as it allows you to type the text that should appear on the watermark.

- Select either the Text watermark or the Picture watermark, depending on which one you prefer.
- If you select “Text watermark,” then type the required text, and the font, size, and color of the text to be watermarked has to be chosen. in addition, the positions and orientation of the watermarked text also have to be set.
- If you select “Picture watermark,” you need to choose the picture that should be inserted and then set the size, position, and washout of the photograph.
Well, by following these steps, you should have been able to insert watermarks in Word with little or no stress at all.
FAQs About Making Watermarks in Word
Here are some important FAQs About Making Watermarks in Word:
1. How do I edit the watermark in Word?
Follow the steps below to edit a watermark in Word:
- Locate the document that is watermarked and must be opened to be edited.
- Open the “Design” tab.
- In the “Page Background” tab, you are to click the button that says “Watermark.”
- On the toolbar, click the drop-down button, from the options provided, select “Custom Watermark”.
- In the latter window, known as “Printed Watermark”, you are able to make further configurations in regards to the watermark text, the type of font, size, color of the watermark, and possible position.
- After adjusting your watermark as you require it, press “OK” to add the watermark to your document.
2. How do I delete the watermark in Word?
Here are the steps to delete the watermark in Word:
- Go to the Word document that has the watermark.
- Click on the ‘Design’ tab.
- Choose the Watermark tool in the ‘Page Background’ tab by simply clicking on the Watermark button.
- Click on ‘Remove Watermark’ from the drop-down list.
- The watermark will be wiped from the document.


