Sometimes, the size of the file containing a Word document becomes very large, and it is not easy to save or transfer the document. For that reason, most of the users would like to find how to make a Word document size smaller or compact without having to affect the size of the gap between the words.
Therefore, this article would interest you if you want to increase storage capacity or reduce the transfer processes of uploads and downloads. As said earlier, here are the 7 best ways to compress Word file size and the best methods to significantly reduce the size of Word documents. Okay, let the conversation start.
Why to compress Word document size?
The following may cause a need to compress the Word document size. Some of the key ones are as follows:
- Free your device space to do other important tasks.
- They are for fast uploading or downloading to ensure file sharing is easy.
- I would ensure that the document is available to the ones with less data or poor internet connection.
- Improve document flow and organization within an organization.
That is why different users can have different motives when the need to compress DOCX file size arises. That is all for now about how to save Word file size, but let’s move on to 7 methods to compress Word document size.
7 Ways to Compress Word File Size
Now, let’s look at 7 more typical methods to compress words. So, go through each method and use the ones that best align with your needs:
1. Save in DOCX Format
The DOCX format was new to Microsoft and was brought in with the release of MS Word 2007. It is just a new cough of the .doc format. Unlike the case of.doc documents, where a file is reasonably large, the DOCX format is similar to a zip file that compresses the document, consuming less space.
Therefore, ensure you know whether the Word document necessary to compress is in .doc or .docx format. If it is in .doc format, then follow the below steps to save the Word document in .docx format:
- Open the .doc Word document.
- Click File > Save as. Under the “save as type,” select the “Word Document (*.docx’) option. Once done, click “Save“.
This way, you can always right-click and compress the size of the Word document and save it in the new DOCX format. But if your Word document is in DOCX format, go through the below methods to compress DOCX files.
2. Compress Pictures
Normally, several pictures would be the major cause of the large file size in Word. Sites that offer richly formatted documents, such as many Pictures Word, provide an option to compress pictures to help reduce the document’s size. Therefore, if your document contains pictures, then follow the below steps to compress them:
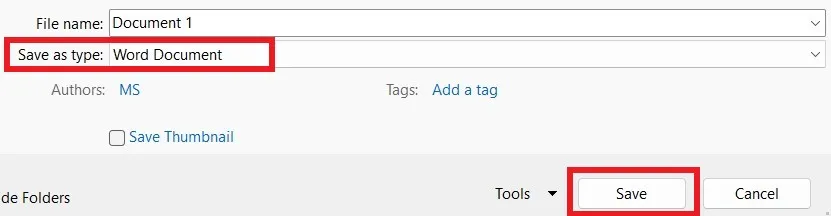
- Find the Word file that you wish to compress and open it.
- Click File > Save as. Go to the’ Tools‘ button next to the ‘Save’ button and select ‘Compress Pictures.’ This will open the ”Compress Pictures“/dashboard.
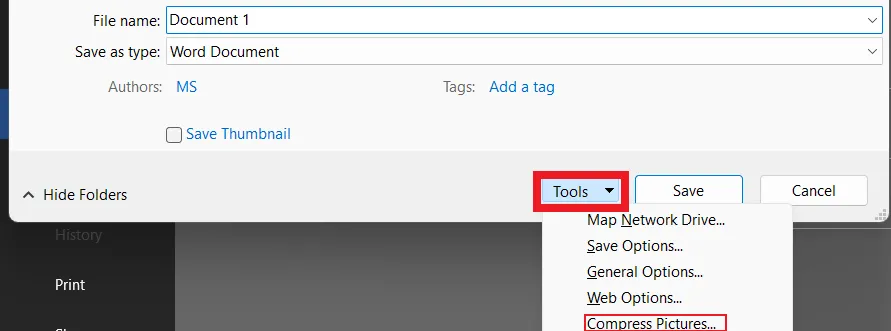
- Ensure that check mark is placed on the ‘Delete cropped areas of pictures’. Then, select the preferred picture resolution. After this process, click on ‘OK’ and you will get a new version of your file.
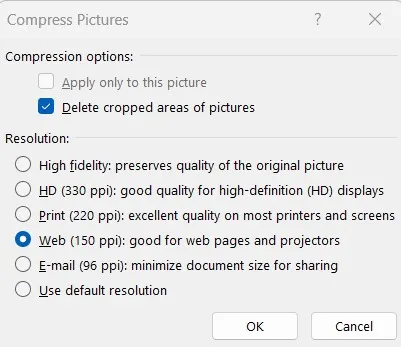
This way, the pictures will get compressed, and your Word file size will decrease contemporaneously.
3. No Longer Saving Pictures in High Definition
Other than compressing pictures using the above method, you can further customize the settings of pictures in the document to reduce the size, such as lowering the resolutions, discarding editing data, etc. Follow the below steps to save pictures at lower resolutions:
- Click the Word document you want to compress to open it.
- To configure Reddit Now, click on the File, Options, and Advanced.
- Under the “Image size and quality,” check “Discard editing data,” uncheck “Do not compress images in the file,” and under “Default resolution,” select 150 PPI or less. Once done, click “OK“.
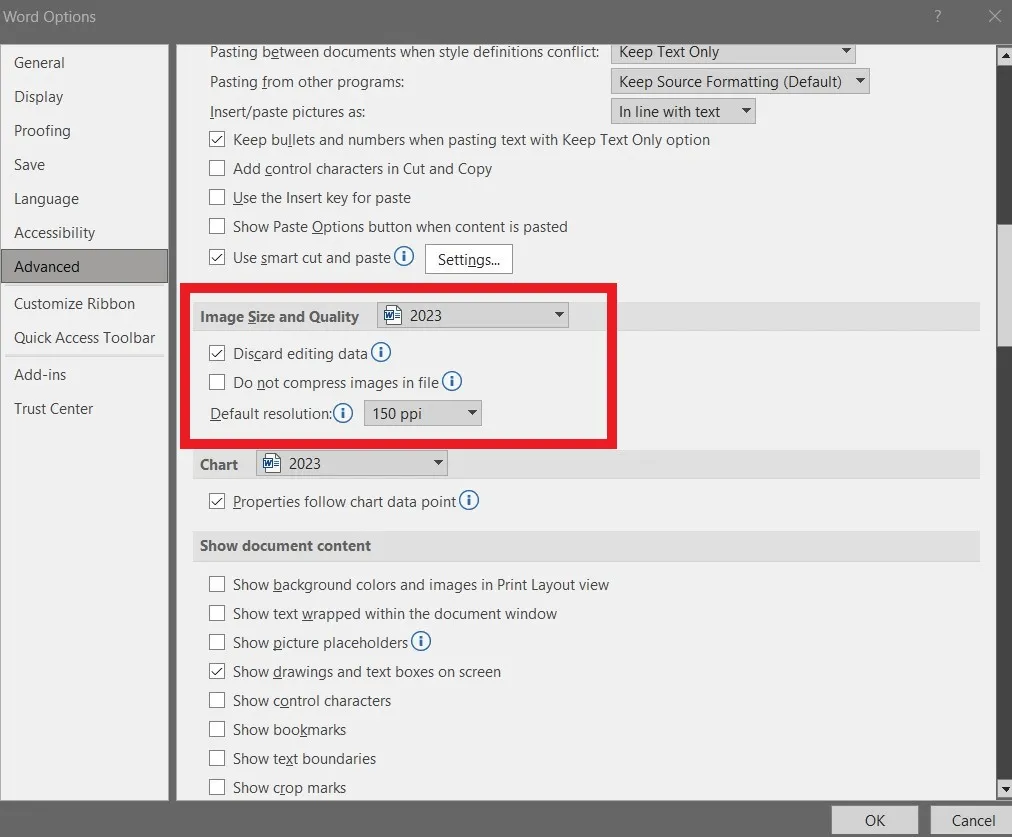
This way, you can reduce the picture sizes and minimize the size of Word documents.
4. Remove Font Embed
If you have worked with your Word document using a certain custom font, other users who receive the document will have trouble viewing it since they might not have it installed on their computers. To this end, Word allows the embedding of fonts in the document to work for everyone.
Yet, to do so will require a far higher amount of space. Hence, it is advised to disable font embedding to reduce the extent of file size considerably. Follow the below steps to remove the font embed:
- Go to the Word file you want to compress.
- Click File > Options. Click the “Save” tab.
- This will uncheck the box that says ‘Embed fonts in the file,’ and clicking OK would do what is needed.
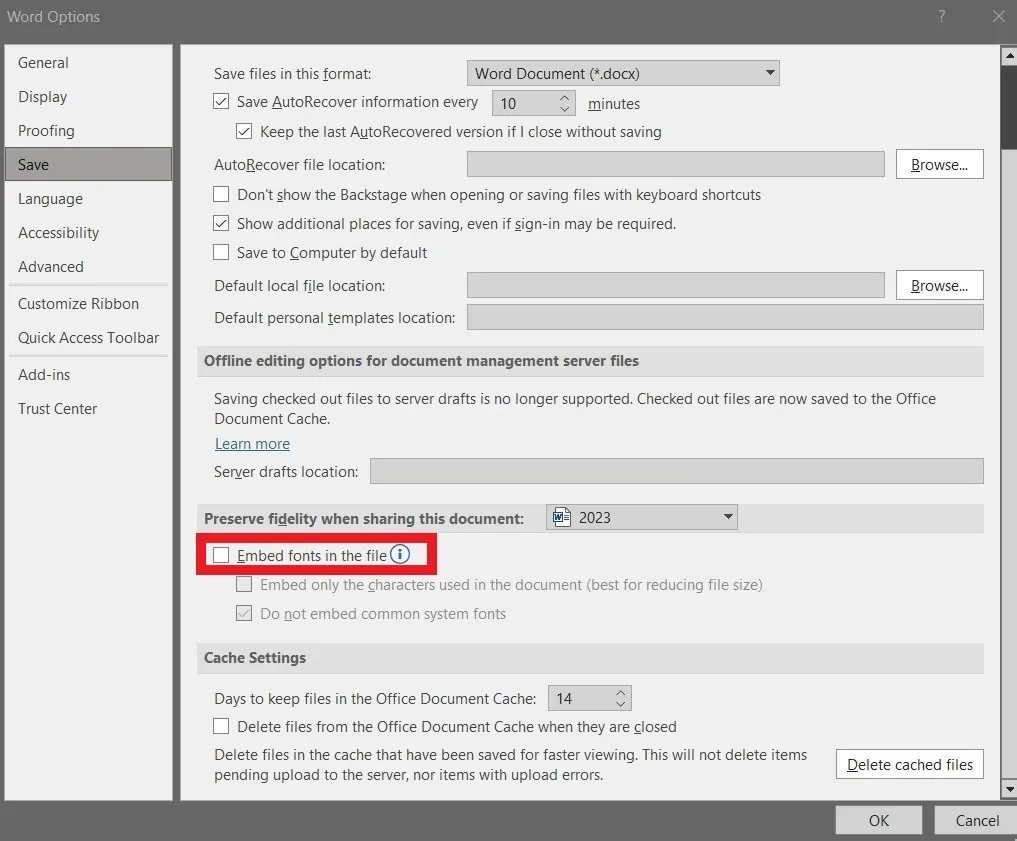
After completing the steps outlined above, the document size will be smaller than when the original file was created.
5. Stop Tracking Changes
If you work with a team, tracking changes in the Word is a great way to see what kind of changes everyone made. However, it also enlarges the file size when returning, and other problems arise. So, once you are done with all the changes, it is recommended to stop the tracker by following the below steps:
- Navigate to the “Review” tab that you will find when working on Word.
- Next to the feature’s name, go to the Tracking Section and click the Track Changes button to disable this feature.

- If you wish to accept all the changes made, go to the drop-down list beside ‘Accept,’ then click ‘Accept All Changes and Stop Tracking.’
That way, you are decreasing the amount of space that the change tracker in Word will take up as a file.
6. Insert Images, not Copy/Paste
Instead of copying/pasting, it is encouraged to substitute the image. This is because when you copy the image and paste it into Word, Word links the file to work with and saves this in BMP or PNG format, which occupies a larger size. Also, it can decrease compression or bring other data, which increases the file size in total. But, if you embed an image, it retains the file type, and the compression level remains the same. Follow the below steps to learn how to insert images in Word:
- Bo in the Word document and click where you want to put an image or picture.
- Go to the top and select “Insert.” Next, click Pictures, followed by This Device.
- Open the desired image in the new window and press the “insert” button.

This way, you can directly place images instead of copying and pasting them. This also helps in making the word file size small.
7. Use Online Word Compressor
Apart from the tested techniques of compressing Word documents using the available features in Microsoft Word, there are also online Word compressors where you can only upload the file and get a copy of the smaller size. Follow the below steps to use an online Word compressor:
- Select the online Word compressor you prefer the most.
- Upload your Word document.
- Select the level of compression that you need and press the ”Compress” button.
- When the file has been compressed, a “Download” button should be clicked to download the file.
In this way, online Word compressors can easily compress Word files within the shortest span of time with no more than a few clicks. However, many online services are characterized by makes and security issues. Therefore, it is advisable always to select a reliable service or use some of the other options we have seen in this piece.


![How to insert a Word document into Excel [Top 8 Methods]](https://samplates.com/wp-content/uploads/2024/12/How-to-insert-a-Word-document-into-Excel-768x432.jpg)